Django Crash Course
- HTTPS Overview
- Getting Started
- Database
- Model
- Template
- View
- Form
- CRUD Operations
HTTPS Overview
- Introduction Video
- HTTPS handles authentication and encryption
- A Web page has three types of contents:
- HTML: the structure data
- CSS: the style
- Javascript: the behavior
- Learn HTML & CSS in 15 minutes
Getting Started
First, use python3 -m pip install django to install the Django package.
Django comes with many tools such as django-admin to make development simple and quick.
To create a project, run the following command: django-admin startproject todo_site.
Initial Project
The command creates a todo_site project folder with following folders and files:
manage.py: it is a thin wrapper arounddjango-admin. It uses the settings of the current project. You usedjango-adminto create projects and apps, then usemanage.pyto perform the rest administration tasks.todo_site: it is the package folder for the project. It has the following files__init__.py: it is an empty file to flag the current folder as a Python package.asgi.py: it is an entry point file for ASGI (Asynchronous Server Gateway Interface) web server. ASGI support asynchronous operations that might have better performance for certain applications at the cost of complex code and logic. Most Web applications don't use it.setting.py: it contains settings (configurations) for this project. For example, you should change theTIME_ZONE = "America/Los_Angeles"if your site is located iLos Angeles, CA, USA. You can find valid time zone names in Time Zone List.urls.py: it configures the URL paths of the project.wsgi.py: it is an entry point file for WSGI (Web Server Gateway Interface) web server. Most Python Web applications use it.
Dev Server
Django has a built-in WSGI web server for the development. You can run it with the initial project. You should run all commands inside todo_site project folder (not the nested todo_site package folder). This is the folder that manage.py lives in. If you are in the wrong folder, Python couldn't find the manage.py file.
Run python3 manage.py runserver, you can check the initial web site at http://127.0.0.1:8000/ or http://locahost:8000/.
The built-in development server monitors file changes and rebuilt the project when there is a change in the project source code files.
To quit the server, type CONTROL-C in the terminal.
Creating an App
A Django project has multiple applications.
Each application is Python package that contains functions of subdomain the website.
An application consists of models, views, templates, static files, URLs, etc.
For example, Django creates a default admin app during the project creation. Web administrators use the admin app to manage the web site.
To create an app named tasks, run the command: python3 manage.py startapp tasks. Again, make sure you run it from the project folder that manage.py lives in.
The App Folder
The creating app command creates a polls folder that has the following files:
__init__.pythe package flag file.admin.pythe placeholder for administration page file.apps.pythe configuration file for the app.migrationsfolder is used to store database migration files.models.pythe data models used by the app.tests.pythe testing fileviews.pyviews are used to process HTTP requests and return HTTP responses.
Application Configuration
There is an apps.py configuration file in an application package.
It defines a subclass of AppConfig
It configures settings such as name, verbose_name in the configuration class.
MVT
Django uses a Model-View-Template (MVT) architecture.
- Model: a model is a class the defines
- the structure of a domain data.
- the data operations.
- View: a view is a function or a class that handles HTTP request, performs business logic, and returns a response.
- Template: a template defines the structure or layout of the user interface. A view fills templates with data to create the final response.
Following is the Django workflow:
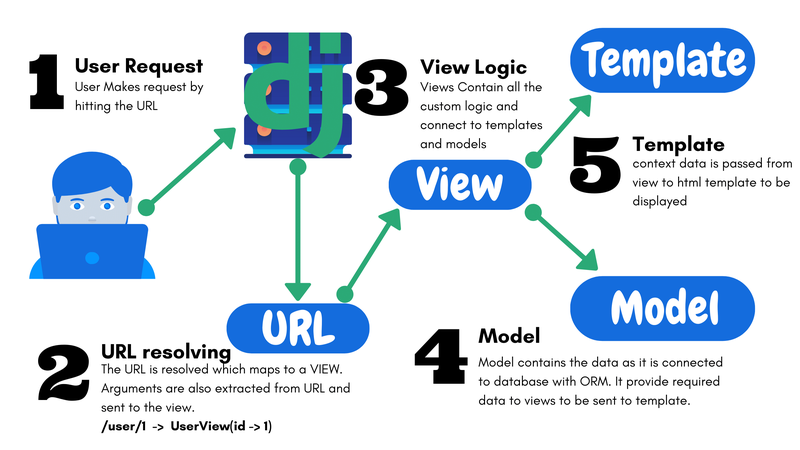
The Django Workflow
The Django framework
- uses an HTTP server to accept HTTP request
- resolves an HTTP request URL to a view
- passes the HTTP request as the input to a view
The View
- process data based on the HTTP request.
- uses templates to render the response data.
- returns responses in different format such as HTML, JSON, or others.
Database
Django uses relational database to store application data that is defined by models.
A model defines the table schema.
Django provides built-in CRUD operations for data.
Django supports a number of relational database engines.
You can change database setup in the project settings.py file.
Database Setup
By default, Django uses the SQLite relational database to manage data. SQLite is a small, fast, and reliable relational database engine. It is an excellent choice for learning Django. It is also a good choice for small to medium web sites in production.
The my_site/settings.py has two database configuration entries in the default item in DATABASES:
ENGINE: default is'django.db.backends.sqlite3'. Other popular choices are'django.db.backends.postgresql'or'django.db.backends.mysql'.NAME: it is a database-specific setting. For SQLite, it is the database file path. For other databases, it is that database name that requires additional settings such asUSER,PASSWORD,HOST,PORTand so on to build the connection string.
Migrations
An app may have models whose data are stored in database.
Django uses migration to manage database schema changes. A migration consists of SQL statements to create tables and data for an app. Whenever you change data models, Django can create a new migration for the changes.
Django provides following commands to manage migrations:
python3 manage.py makemigrations: creates new migrations based on the changes detected to your models.python3 manage.py migrate: apply pending migrations to the database.python3 manage.py showmigrations: shows all migrations in a project. Migrations are stored in themigrationssubfolder inside the app folder.python3 manage.py sqlmigrate app_label migration_name: displays the SQL commands for the named migration.
Model
To define a table schema and related database operations, you define a new subclass of models.Model.
Django derives database migrations from model definition, thus there is only a single source definition of application data.
If you change a data model, Django can create updated migrations for the changes. You can even roll back changes in some cases.
Creating Models
In the tasks app, there is only one models: Task. Adding following class definition in tasks/models.py file.
from django.db import models


class Task(models.Model):
    name = models.CharField(max_length=20, null=False)
    description = models.TextField(max_length=200, default="")
    is_done = models.BooleanField(default=False)
Install the App
Django creates table schema and database access API based on app model definitions.
You need to add the tasks app to the list in the INSTALLED_APPS item in the project's settings.py file. Just add "tasks as the first element in the INSTALLED_APPS list.
Then in the project folder, create a migration from the app models using command python3 manage.py makemigrations tasks. It creates a migration file in polls/migrations/0001_initial.py that has the migration code.
You can use the command python3 manage.py sqlmigrate tasks 0001 to check the SQL statements that to be applied to the database.
Finally, run python3 manage.py migrate to apply the migration that creates the database tables.
Template
A typical web site has many pages that have a similar layout and display style.
A web page may have many static components.
Django uses template to render web pages.
A template defines static content and provides blocks that can be inherited and replaced by other templates.
A Base Template
In the project folder, create a templates directory and a base.html in it.
Set "DIRS": [BASE_DIR / "templates"], in TEMPLATES item in project settings.py file. Django will search the directory for template files. The BASE_DIR is the project folder.
The base.html uses Bootstrap to provide CSS styles for web page. It also provides many icons.
It defines a content block that can be replaced by other templates.
Tips: in VS Code, use ! and a tab to create an initial page content.
<!DOCTYPE html>
<html lang="en">

<head>
  <meta charset="UTF-8">
  <meta name="viewport" content="width=device-width, initial-scale=1.0">

  <!-- This link includes bootstrap css CDN to all pages. -->
  <link href="https://cdn.jsdelivr.net/npm/[email protected]/dist/css/bootstrap.min.css"
    rel="stylesheet"
    integrity="sha384-T3c6CoIi6uLrA9TneNEoa7RxnatzjcDSCmG1MXxSR1GAsXEV/Dwwykc2MPK8M2HN"
    crossorigin="anonymous">

  <!-- This link includes bootstrap icons CDN to all pages. -->
  <link rel="stylesheet"
    href="https://cdn.jsdelivr.net/npm/[email protected]/font/bootstrap-icons.css">
  <title>Todo List</title>
</head>

<body>
  <div class="container">
    {% block content %}{% endblock content %}
  </div>
</body>

</html>
The Home Template
Each app can have many template files. The "APP_DIRS": True, in the TEMPLATES item of project setting file means you can define app templates in app's templates directory.
Create tasks/templates/tasks/task_list.html with the following content. Django has conventions about directory structure and filename. Using a <model_name>_list.html saves a configuration in a view class that uses the template. Here the <model_name> is task because the model class is Task.
{% extends "base.html" %}

{% block content %}

<h1>Todo Tasks</h1>

{% endblock content %}
View
Typically, a Django view takes an HTTP requests as its input, loads and processes application data, generates a HTTP response using a template, then returns a HttpResponse object or raises an exception.
There are three steps to create a view:
- create a template that is used to render the response.
- define the view function/class that process data and render response.
- configure an URL pattern for the view.
The Home View
Django is famous for its simplicity and rich built-in features because it provides many functions and classes for common tasks.
It is common to show a list of objects. Django has a so-called generic view class ListView as a super class for such views.
The home view shows a list of tasks, the view definition in tasks/views.py is very simple. By specifying model = Task, the view gets tasks from database and render the task_list.html with list of tasks. If you don't use the task_list.html as the template name, you should set template_name class attribute to the customized template name.
from django.views.generic import ListView

from .models import Task


class TaskListView(ListView):
    model = Task
Set URLs
You need to set two types of URLs
- the
tasksapp URLs: create a path as showntasks/urls.pyfile - as shown below. - link the
tasksURLs to the project root URLs. Addpath("", include("tasks.urls")),as the first item to theurlpatternsintodo_site/urls.py.
Now you should be able to see the Todo Tasks H1 header in the homepage.
# tasks/urls.py

from django.urls import path

from .views import TaskListView

urlpatterns = [
    path("", TaskListView.as_view(), name="task_list"),
]
Form
A web page uses forms to display widgets such as input box, dropdown list, radio button etc to get user inputs.
Forms are used to create a new object and to update an existing object.
Again, Python provides help class to make it easy to create forms.
To define a form class, use the ModelForm super class, then specify the data model and data fields used in form template file.
# tasks/test_form.py

from django.forms import ModelForm
from .models import Task


class TaskForm(ModelForm):
    class Meta:
        model = Task
        fields = "__all__"
Form Template
A form template uses a form class to create/update an instance of the specified model class.
To make it simple, use <model_name>_form.html as the form template name.
Create tasks/templates/tasks/task_form.html.
{% extends "base.html" %}

{% block content %}

<h1>Create a Task v2</h1>
<form method="post">
  {% csrf_token %}
  {{ form.as_p }}
  <input type="submit" />
</form>

{% endblock content %}
CRUD Operations
CRUD stands for Create, Read, Update and Delete, four common object operations.
It is not a surprise that Django provides four generic classes as base classes for CRUD views:
CreateView: create an objectDetailView: show object attributesUpdateView: update object attributesDeleteView: delete an object
Create Operation
- View
- Define a
TaskCreateViewsubclass ofCreateViewinviews.py. - Set its
model,form_class, andsuccess_url. By default, the view uses<model_name>_form.htmlas its template. - Use
reverse_lazy()to get home URL at runtime. - Url
- Add
path("create/", TaskCreateView.as_view(), name="task_create"),tourlpatternsintasks/urls.py
from django.views.generic import CreateView

from django.urls import reverse_lazy
from .models import Task
from .task_form import TaskForm

class TaskCreateView(CreateView):
    model = Task
    form_class = TaskForm
    success_url = reverse_lazy("task_list")
Revise Home Template
Add two components in tasks/templates/tasks/task_list.html:
- A link to
task_createurl - A table that shows a list of tasks. The list of tasks is the context object that could be accessed as
task_listorobject_list.
{% extends "base.html" %}

{% block content %}

<h1>Todo Tasks</h1>
<a href="{% url 'task_create' %}">Add Task</a>

<table class="table table-striped">
  <thead>
    <tr>
      <th>Task</th>
      <th>Done?</th>
      <th>Action</th>
    </tr>
  </thead>
  <tbody>
    {% for task in task_list %}
    <tr>
      <td>
        {{ task.name }}
      </td>
      <td>
        {% if task.is_done %}Yes{% else %}No{% endif %}
      </td>

    </tr>
    {% endfor %}
  </tbody>
</table>

{% endblock content %}
Read Operation
- View
- Define a
TaskDetailViewsubclass ofDetailViewinviews.py. - Template
- Create
tasks/templates/tasks/task_detail.htmltemplate - Url
- Add
path("tasks/<int:pk>/", TaskDetailView.as_view(), name="task_detail"),tourlpatternsintasks/urls.py - Link from home view
- Add a link in
tasks/templates/tasks/task_list.htmlfor each task to open the task detail page.
from django.views.generic import DetailView


class TaskDetailView(DetailView):
    model = Task
{% extends "base.html" %}

{% block content %}

<h1>{{ task.name }}</h1>
<p>{{ task.description }}</p>
<p>Completed: {% if task.is_done %}Yes{% else %}No{% endif %}</p>

<a class="btn btn-info" href="{% url 'task_list' %}" role="button">Home</a>

{% endblock content %}
<!-- add a link for each task before the <td> cell of task name in tasks/task_list.html -->
<a class="icon-link" href="{% url 'task_detail' task.pk %}">
<i class="bi bi-receipt"></i> </a>
Update Operation
- View
- Define a
TaskUpdateViewsubclass ofUpdateViewinviews.py. - Set its
model,form_class, andsuccess_url. By default, it uses form templatetask_form.html. - Use
reverse_lazy()to get home URL at runtime. - Url
- Add
path("tasks/<int:pk>/update/", TaskUpdateView.as_view(), name="task_update"),tourlpatternsintasks/urls.py. - A link from task detail view
from django.views.generic import UpdateView

class TaskUpdateView(UpdateView):
    model = Task
    form_class = TaskForm
    success_url = reverse_lazy("task_list")
<!-- add a link for each task in tasks/task_detail.html -->
{% extends "base.html" %}

{% block content %}

<h1>{{ task.name }}</h1>
<p>{{ task.description }}</p>
<p>Completed: {% if task.is_done %}Yes{% else %}No{% endif %}</p>
<br >
<a href="{% url 'task_update' task.pk %}">Edit task</a>

{% endblock content %}
Delete Operation
- View
- Define a
TaskDeleteViewsubclass ofDeleteViewinviews.py. - Template
- Create
tasks/templates/tasks/task_confirm_delete.htmltemplate - Url
- Add
path("tasks/<int:pk>/delete/", TaskDeleteView.as_view(), name="task_delete"),tourlpatternsintasks/urls.py - Link from home view and detail view for each task
from django.views.generic import DeleteView

from django.urls import reverse_lazy


class TaskDeleteView(DeleteView):
    model = Task
    success_url = reverse_lazy("task_list")
{% extends "base.html" %}

{% block content %}
<h1>Confirm Delete V3</h1>
<p>Are you sure you want to delete task "{{ task.name }}"?</p>
<form method="post">
  {% csrf_token %}
  <button type="submit">Delete</button>
  <a href="{% url 'task_list' %}">Cancel</a>
</form>

{% endblock content %}
<!-- in task_list.html, before each task name -->
<a class="icon-link" href="{% url 'task_delete' task.pk %}">
<i class="bi bi-trash"></i>
</a>
<!-- in task_detail.html, before edit link -->
<a href="{% url 'task_delete' task.pk %}">Delete task</a>